Pinterest is basically the world’s biggest idea library for interiors Virtual Staging ideas, staging mood boards, and “Pinterest to reality” transformations are everywhere. The problem? A Pinterest board is inspiring, but it’s not a staged room you (or your client) can actually see and approve. This tutorial shows you how to take a pinterest moodboard to virtual staging in a fun, fast, practical way using AI + images to generate 3D-looking, photoreal virtual staging renders for your own room or a client’s listing/design presentation.
1) Build a “Staging-Ready” Pinterest Moodboard (Not Just a Pretty One)
Pinterest boards can get chaotic fast. If your goal is virtual staging, build your board like you’re directing a photoshoot.
Create one board per room (Living Room / Bedroom / Kitchen) and pin with intention:
- Room layout references: 5–10 pins showing similar room shapes (open-plan vs. boxed room, window placement, ceiling height).
- Style anchors: 8–15 pins that repeat the same vibe (Japandi, Modern Organic, Transitional, Coastal, etc.).
- Furniture priorities: 6–12 pins where the hero items are clear (sofa silhouette, bed frame style, dining table shape).
- Material + palette pins: woods, metals, fabrics, paint colors—things that make the room feel cohesive.
Quick rule: If you can’t describe your board in one sentence (“Warm modern organic living room with light oak + cream boucle + black accents”), it needs editing.
If you want more structure for converting boards into AI renders, pair this with MoodboardsAI’s workflow resources: From Canva Moodboard to Virtual Staging: The Interior Designer’s AI Workflow for Client‑Ready 3D Rooms
2) Curate Your Pins Into a Clean “Input Set” (AI Loves Consistency)
Pinterest is great for inspiration, but AI staging works best when your inputs are clear and consistent.
Do this:
- Pick 12–20 of your strongest pins (quality over quantity).
- Favor images that show:
- clear furniture edges (sofas, beds, tables)
- consistent lighting (don’t mix dark moody + ultra-bright airy)
- similar camera angles (eye-level interiors are easiest)
Avoid:
- overly filtered pins
- collage graphics with tiny furniture
- super wide-angle “distorted” rooms
- images with heavy text overlays
Pro tip: Include 2–3 “hero” pins that absolutely define the space. If AI nails these, the rest falls into place.
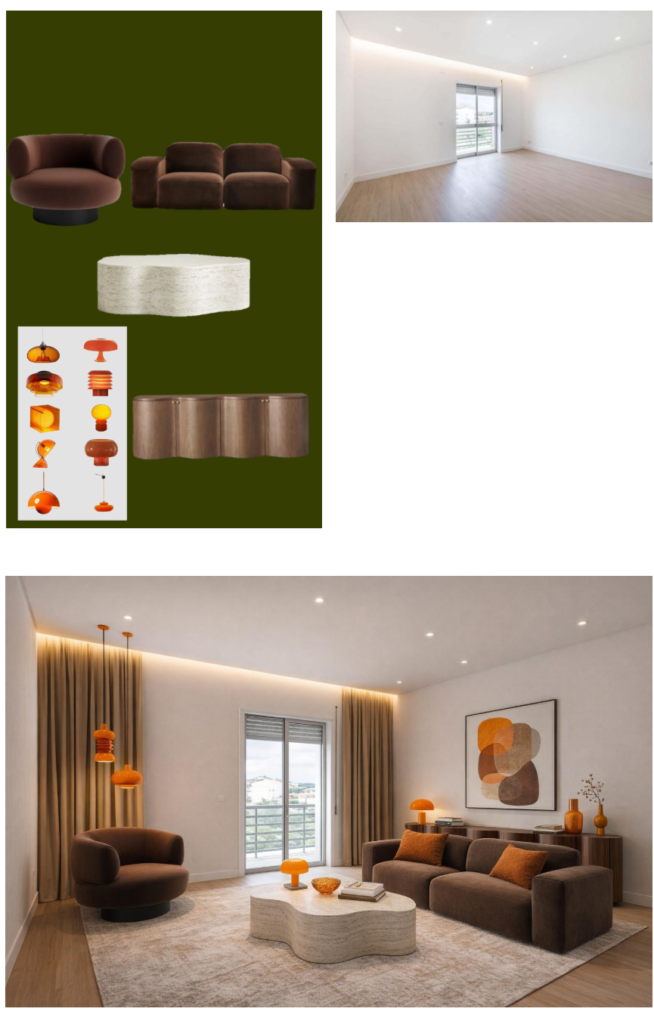
3) Pick the Right Base Room Photo (Your Room or Your Client’s Room)
Virtual staging needs a “canvas”: a photo of the actual room (empty or lightly furnished).
Best base photos for AI virtual staging:
- taken straight-on from a corner or doorway
- daylight, minimal shadows
- level horizon (no tilted camera)
- higher resolution if possible
If the room is cluttered: tidy it up. AI will try to interpret clutter as “objects,” which can dilute the staged result.
If you don’t have a room photo yet: you can still create concept renders from the moodboard first, then stage a real room photo later once you receive listing photos.
Want the overview of turning inspiration into real spaces?
4) Pinterest Moodboard to Virtual Staging With MoodboardsAI (The Fun Part)
Now you’re ready to convert inspiration into a staged, 3D-looking render using AI.
Goal: Make the AI “understand” your Pinterest moodboard as a cohesive design direction, then generate a virtual staged room render that looks like a real listing photo—only better.
Your simple workflow:
- Collect your Pinterest moodboard images (your curated set).
- Upload your moodboard inspiration + room photo into MoodboardsAI (so the AI has both the style and the space).
- Generate staged render options until you get the best layout + vibe match.
- Refine by swapping inspiration images:
- If the sofa looks wrong → add 2 more sofa-specific pins
- If the room feels too cold → add warmer wood + warm lighting pins
- If it’s too busy → remove overly decorative pins and focus on silhouettes
MoodboardsAI is designed specifically for this: taking your 2D moodboard images and producing client-ready, photoreal 3D-style staging renders from them.
5) Make It “Client-Ready” (So Approvals Happen Faster)
A Pinterest board sparks opinions. A staged render gets decisions.
To make your virtual staging presentation land:
- Generate 2–3 variations per room:
- “Safe” (most universally appealing)
- “On-brand” (closest to the moodboard heroes)
- “Bold option” (one dramatic material or accent color)
- Keep the furniture story consistent:
- same wood tones across key pieces
- repeated accent color (pillows, art, decor)
- lighting style aligned with the board (modern black vs. soft brass)
If you’re presenting to a client, send:
- 1 staged render (main)
- 1 alternate render (backup)
- 1 image collage of the 6–8 key pins that inspired it
This creates instant trust: “Yes, this came from my board.”
FAQ: Pinterest Moodboards + AI Virtual Staging
How do I create a digital mood board on Pinterest?
Create a Pinterest board for one room, pin your favorite style references, then narrow it down to a curated set that repeats the same palette, materials, and furniture silhouettes. For virtual staging, focus on clear interior photos (not text-heavy collages), then export/save your strongest 12–20 images to use as your AI “style input.”
Is Pinterest good for mood boards?
Yes—Pinterest is one of the best places to build moodboards quickly because it’s packed with real-room inspiration. The key is editing: a smaller, consistent board produces better AI staging results than a giant board with mixed aesthetics.
Conclusion: Pins Are Inspiration and AI Help Makes Them Look Real
A Pinterest board is the starting line. Virtual staging is the finish line—where ideas become photoreal images that you can present, approve, and actually use for a room plan or listing.
If you want to turn a pinterest moodboard to virtual staging without learning complex 3D software, the fastest path is using an AI workflow built for moodboards + rooms.